Using Allen-Bradley BootP Server
The intent of this document:
To give a step by step view of using BootP server in the Windows 10 environment.
So that if a device calls to use BootP server or does not have the ability to use the webpage for the device then you have a successful method of setting the IP address for field use.
Document Table Of Contents
Setting the IP address of a device without an IP address
Setting The IP Address From The MAC Address
Setting the IP address of a device without an IP address
Getting Connected
The first step is to make sure you have an active connection to the device that you are wanting to set the IP address on. This means having a connection via an Ethernet cable from the computer’s Ethernet port to the Ethernet port of the device.
Generally can tell if the light flashes on the device if there is an indicator light present or either look at the back of the computer to see if the Ethernet port indicator light is flashing.
Note: it may not be a solid flashing light, it may only be inter-immediate which is fine.
Check MAC Address On Device
Before you start, it is a best practice to take note of the device’s MAC address which is generally on a tag or a sticker of the device’s label. This could also can be on a cast of the device as well, make sure you know the MAC address of the device to make the BootP server setup fast & easy.
MAC Address Example: 00:0E:CF:10:65:74
Open Boot-P Server
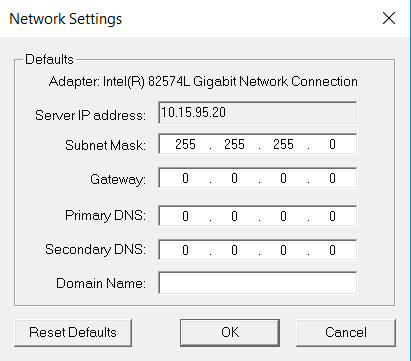
Go to the windows start menu scroll to the BootP server then open the software, if this is the first time that you are using BootP server on this computer then it will prompt you to enter a subnet.
Direct Software Location: Start menu—Rockwell Software–BootP-DHCP Tool
Note: The subnet in most cases should be 255.255.255.0
The subnet of 255.255.255.0 best fits for most network devices.
Verifying Connection
Now that we have a connection & the BootP server software open with the subnet set, we can now see that the BootP server is finding the devices with connections.
If not, then check your connection.
Note: your computer’s network connection can either be in DCHP or have a static IP address.
If you are in a DHCP then you could see up to three MAC addresses when scanning.
You can also have success with having your computer’s network card set as a static IP address. Generally, one that is in line with the IP address that is being set to the device using this process but in most cases you should use DHCP.
Setting The IP Address From The MAC Address
Now that the connection is verified, find the MAC address for the device that you are setting the IP address for then highlight it & press the “Add Relation” button.
Note: This should be the MAC address that says “BootP” in the type field.
After the “Add Relation” button is pressed then you will need to enter in the IP address that you want the device to be set to.
In the example below, I entered 10.15.95.43
Next, press the “Ok” button.
Disabling BootP/DHCP
Before you press the “Disable BootP/DHCP” button, you need to make sure the IP address of your computer is in range of the IP address that you just set to the device.
Note: You must know the current IP address & the MAC address for this device.
In this case, you will need to have your computer’s IP address in line with the device’s IP address.
Meaning, the first three Octal will match but the last one will be different.
IP Address Example: if the device is 10.15.95.43 then the computer can be 10.15.95.xxx
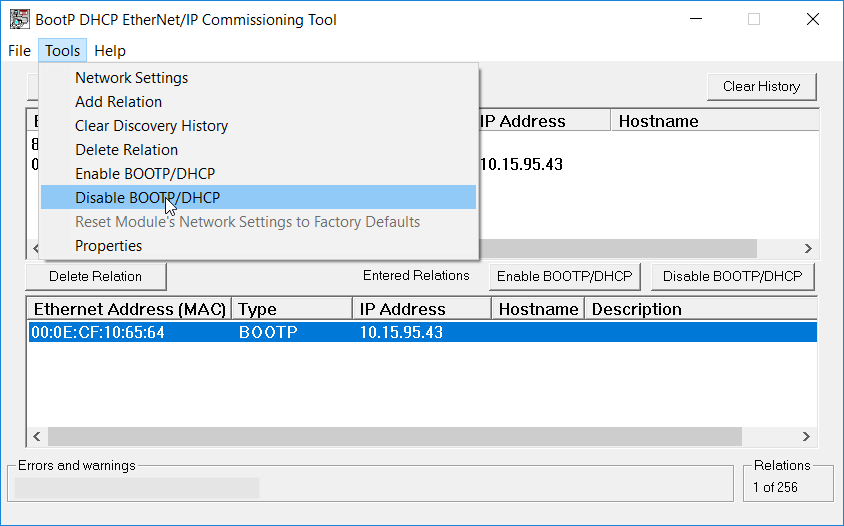
Once your IP address is in the same range as the device then press the “Disable BootP/DHCP” button from the drop-down icon in the Tools tab from the top window.
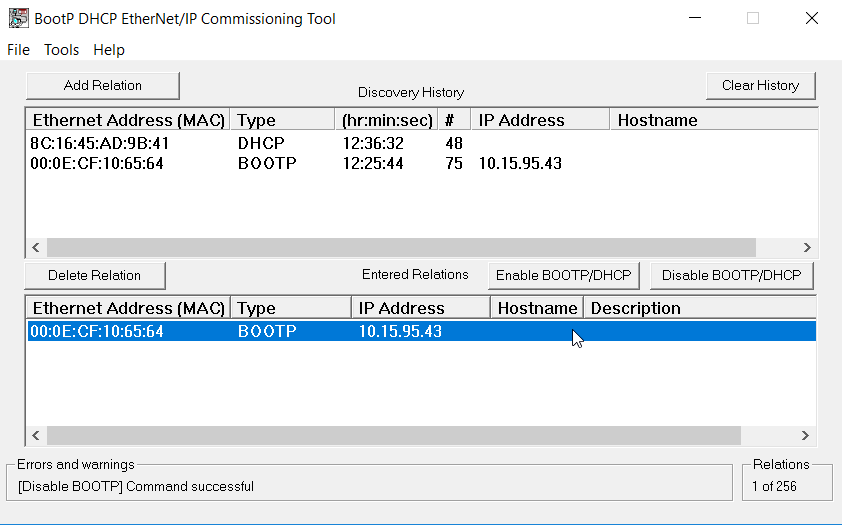
After pressed, it should say “[Disable BOOTP] Command successful” as shown below.
Checking work
Now close BootP server & open Rslinx Classic.
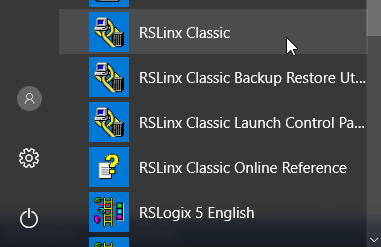
Navigate to Rslinx Classic from the start menu then open it.
The direct path: Start—Rockwell Automation—RSLinx Classic.
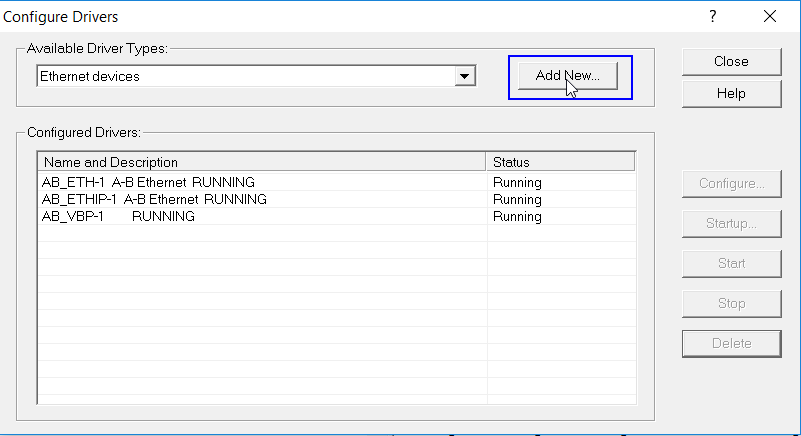
After Rslinx opens, make an Ethernet driver for RSLinx.
I recommend that you use a standard Ethernet driver.
Which is “Ethernet Devices”, This driver makes you manually enter the IP address of the devices used however; it detects all devices much better the auto-detect Ethernet driver “EtherNet/IP Driver”.
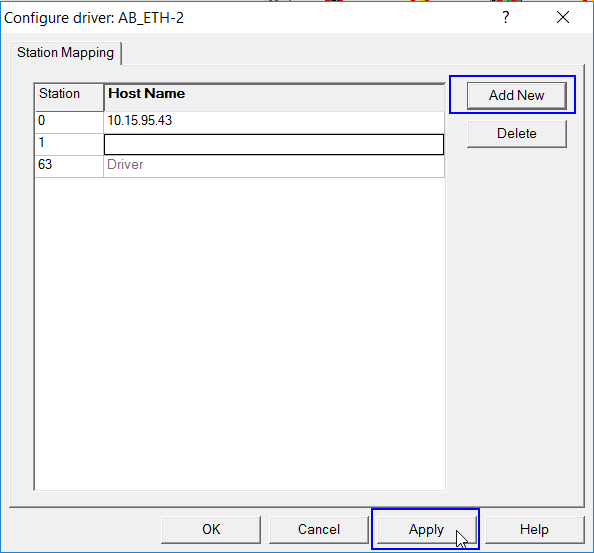
Then add the IP address for the device to the RSLinx driver so that you can run the driver to see this device in RSLinx Classic.
In the example below, I added the one we have been using 10.15.95.43
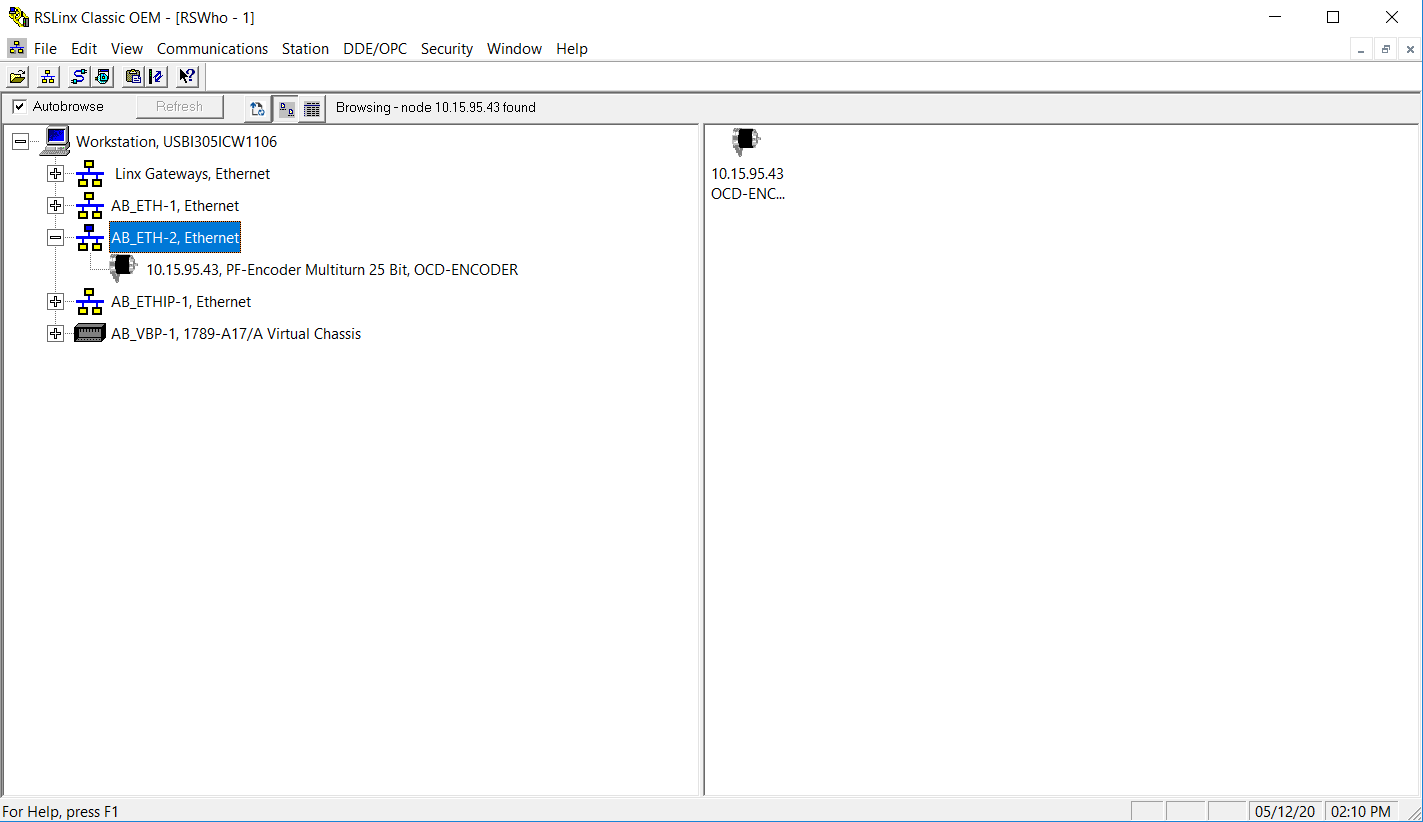
Then open the driver in Rslinx & you should now see the device with the new IP address listed, note that we aren’t done yet.
Now cycle the power on the device & verify that it comes back at the same IP address as you just set.
Leave your computer connected to the device so that you can watch Rslinx pick the device back up.
Note: if the device loses it’s IP address after you cycled the power then you may not have disabled the BootP/DHCP feature in the previous step…..jump back to Disabling BootP
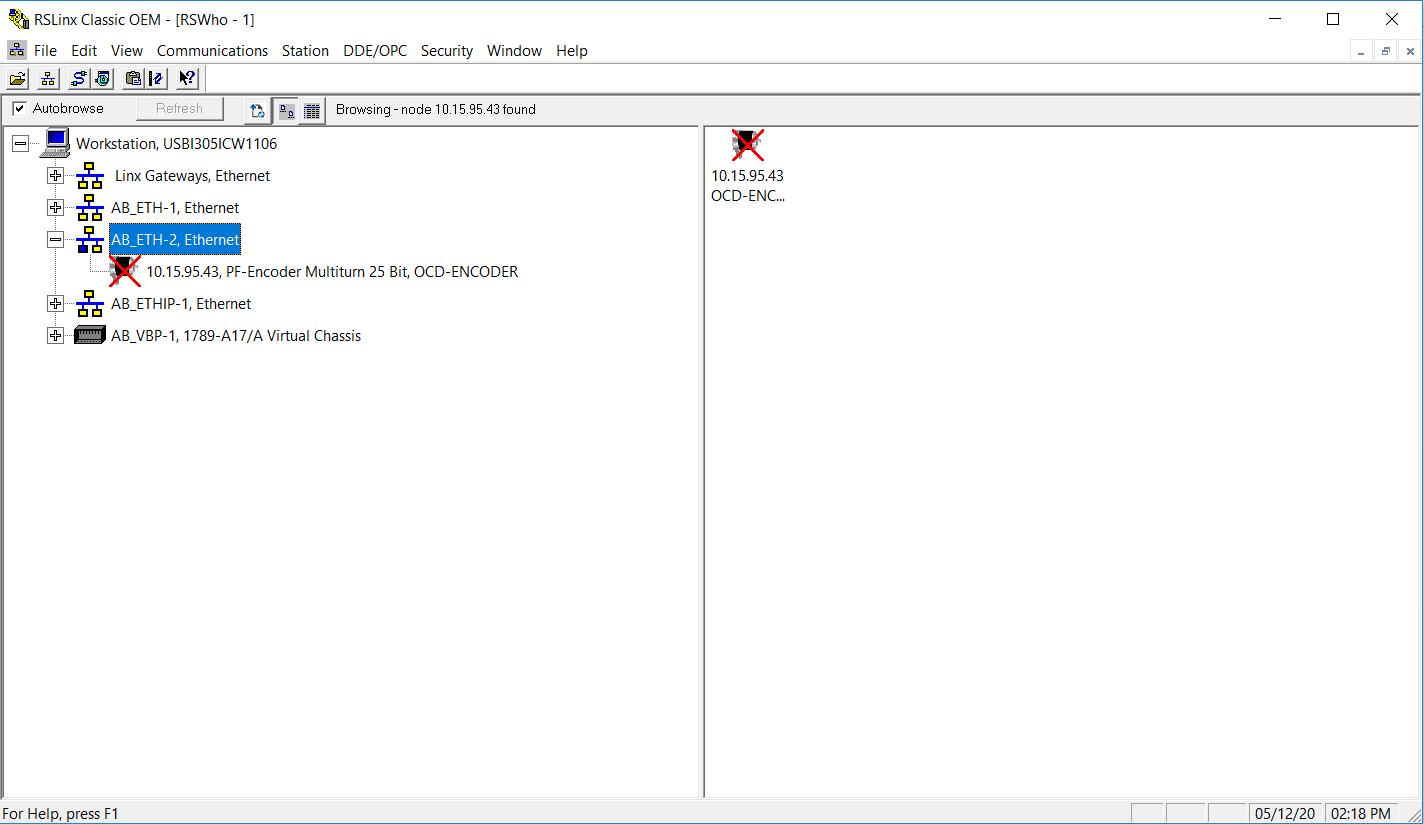
When you disconnect the power it should have a red X on the device in Rslinx.
Then re-connect the power to verify that the device kept the IP address.
As long as the device keeps its IP address after the power cycle then you have successfully set the IP address for use. One other thing to check is if the device has a properties tab in RSLinx so that you can set the device connection speed along & gateway if used.
The device we used in this example does not have an active properties tab so, in order to set that, we have to use RsNetWorx for Ethernet.
Other than that….Congrats!
You are all set.
Windows 10 – Using BootP Server
The intent of this document:
To give a step by step view of using BootP server in the Windows 10 environment.
So that if a device calls to use BootP server or does not have the ability to use the webpage for the device then you have a successful method of setting the IP address for field use.
Document Table Of Contents
Setting the IP address of a device without an IP address
Setting The IP Address From The MAC Address
Setting the IP address of a device without an IP address
Getting Connected
The first step is to make sure you have an active connection to the device that you are wanting to set the IP address on. This means having a connection via an Ethernet cable from the computer’s Ethernet port to the Ethernet port of the device.
Generally can tell if the light flashes on the device if there is an indicator light present or either look at the back of the computer to see if the Ethernet port indicator light is flashing.
Note: it may not be a solid flashing light, it may only be inter-immediate which is fine.
Check MAC Address On Device
Before you start, it is a best practice to take note of the device’s MAC address which is generally on a tag or a sticker of the device’s label. This could also can be on a cast of the device as well, make sure you know the MAC address of the device to make the BootP server setup fast & easy.
MAC Address Example: 00:0E:CF:10:65:74
Open Boot-P Server
Go to the windows start menu scroll to the BootP server then open the software, if this is the first time that you are using BootP server on this computer then it will prompt you to enter a subnet.
Direct Software Location: Start menu—Rockwell Software–BootP-DHCP Tool
Note: The subnet in most cases should be 255.255.255.0
The subnet of 255.255.255.0 best fits for most network devices.
Verifying Connection
Now that we have a connection & the BootP server software open with the subnet set, we can now see that the BootP server is finding the devices with connections.
If not, then check your connection.
Note: your computer’s network connection can either be in DCHP or have a static IP address.
If you are in a DHCP then you could see up to three MAC addresses when scanning.
You can also have success with having your computer’s network card set as a static IP address. Generally, one that is in line with the IP address that is being set to the device using this process but in most cases you should use DHCP.
Setting The IP Address From The MAC Address
Now that the connection is verified, find the MAC address for the device that you are setting the IP address for then highlight it & press the “Add Relation” button.
Note: This should be the MAC address that says “BootP” in the type field.
After the “Add Relation” button is pressed then you will need to enter in the IP address that you want the device to be set to.
In the example below, I entered 10.15.95.43
Next, press the “Ok” button.
Disabling BootP/DHCP
Before you press the “Disable BootP/DHCP” button, you need to make sure the IP address of your computer is in range of the IP address that you just set to the device.
Note: You must know the current IP address & the MAC address for this device.
In this case, you will need to have your computer’s IP address in line with the device’s IP address.
Meaning, the first three Octal will match but the last one will be different.
IP Address Example: if the device is 10.15.95.43 then the computer can be 10.15.95.xxx
Once your IP address is in the same range as the device then press the “Disable BootP/DHCP” button from the drop-down icon in the Tools tab from the top window.
After pressing, it should say “[Disable BOOTP] Command successful” as shown below.
Checking work
Now close BootP server & open Rslinx Classic.
Navigate to Rslinx Classic from the start menu then open it.
The direct path: Start—Rockwell Automation—RSLinx Classic.
After Rslinx opens, make an Ethernet driver for RSLinx.
I recommend that you use a standard Ethernet driver.
Which is “Ethernet Devices”, This driver makes you manually enter the IP address of the devices used however; it detects all devices much better the auto-detect Ethernet driver “EtherNet/IP Driver”.
Then add the IP address for the device to the RSLinx driver so that you can run the driver to see this device in RSLinx Classic.
In the example below, I added the one we have been using 10.15.95.43
Then open the driver in Rslinx & you should now see the device with the new IP address listed, note that we aren’t done yet.
Now cycle the power on the device & verify that it comes back at the same IP address as you just set.
Leave your computer connected to the device so that you can watch Rslinx pick the device back up.
Note: if the device loses it’s IP address after you cycled the power then you may not have disabled the BootP/DHCP feature in the previous step…..jump back to Disabling BootP
When you disconnect the power it should have a red X on the device in Rslinx.
Then re-connect the power to verify that the device kept the IP address.
As long as the device keeps its IP address after the power cycle then you have successfully set the IP address for use. One other thing to check is if the device has a properties tab in RSLinx so that you can set the device connection speed along & gateway if used.
The device we used in this example does not have an active properties tab so, in order to set that, we have to use RsNetWorx for Ethernet.
Other than that….Congrats!
You are all set.

